Troubleshooting
- If you have trouble connecting to your repository or Forms server, try connecting to your organization's network via VPN to access the repository with the same rights you would have if accessing it from the office.
- Connect to your organization's network by using the wireless network that is inside the firewall. If you can connection from inside the firewall, the firewall settings may be the problem. See the Types of Firewall Configurations topic in the Web Access help files for more information.
- If you have Web Access and it's on the same machine as the Laserfiche Mobile Server, try to connect to Web Access through a browser on the device. If you can't access Web Access, then you won't be able to access Laserfiche Mobile. If you are unable to connect your device to your organization's network, then Web Access will need to be accessible to the public from the Internet. See the Types of Firewall Configurations topic in the Web Access help files for more information.
The Laserfiche Mobile Server installs the components that enable Laserfiche Mobile apps (Android, iOS, and Windows) to accept connections from the Laserfiche Server, Laserfiche Forms server, and the Laserfiche Mobile Image Processing service.
Laserfiche Mobile Image Processing
The Laserfiche Mobile Image Processing service enables you to process images captured with Laserfiche Mobile and needs to be running in order to perform image processing on your newly created documents. Users will be warned during capture if it is off. However, documents can still be uploaded without processing.
To turn on the Laserfiche Mobile Image Processing service
- Click the Windows Start button on the computer the Laserfiche Mobile Server is installed on. (If you are running Windows 8, from the desktop select Settings from the Charms bar.)
- Select Control Panel.
- Select Administrative Tools. (If you are running Windows 7 or 8, you may need to select System and Security and click Administrative Tools.)
- Double-click Services.
- In the Name column, select Laserfiche Mobile Image Processing Service.
- Under the Status column, verify that the Laserfiche Mobile Image Processing Service service is Started. If the Status column is blank the service is not running, and you will need to manually start the service.
- Click the Start link to the left of the list of services.
To log in to Laserfiche Mobile, you will need to enter a Laserfiche Mobile Server URL on the Sign-In page. In some cases, this URL will need to be written as a fully qualified domain name (FQDN) such as mycomputer.laserfiche.com.
- If you are using Android, you will be required to enter the URL as a fully qualified domain name.
- If you are using iOS, and you configure the Search Domains option for each hotspot you connect to, you will not need to enter the URL as a fully qualified domain name.
- If you are using Windows, and your administrator has added the domain name under the DNS suffix option in network settings, you will not need to enter the URL as a fully qualified domain name.
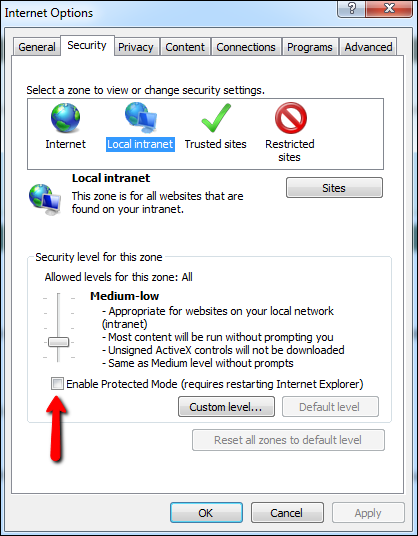
If you have trouble opening the Laserfiche Mobile Configuration page successfully, and you are using Internet Explorer 11, try clearing the Enable Protected Mode checkbox in the Security tab under Internet options.
You may receive this message when working with forms in Laserfiche Mobile:
The certificate for this server is untrusted. You might be connecting to a server that is pretending to be "user's Forms server" which could put your confidential information at risk. See the Troubleshooting section in the help files to learn how to install a trusted certificate.
Follow the steps below to connect to a Forms server and install a trusted certificate on the phone running the Laserfiche Mobile app.
Note: The Windows Phone 8.1 certificate installer supports .cer, .p7b, .pem, and .pfx files.
- On a machine or tablet, enter the Forms server URL into Internet Explorer.
- You will see a web page informing you of a problem with it security certificate. Press Continue to this website (not recommended).
- The URL bar will turn pink. Press Certificate Error to the far right of the URL address.
- An Untrusted Certificate dialog will appear. Click View certificates.
- In the Certificate dialog box, under the Details tab, click Copy to File. If you do not see this button, close Internet Explorer, right-click on Internet Explorer, click Run as administrator, and navigate to the Forms server URL again.
- In the Certificate Export Wizard, click Next.
- Choose the format in which you want to export the certificate and click Next.
- Browse to where you want the certificate exported, give it a name, and click Save.
- Click Next.
- On the Completing the Certificate Export Wizard step, click Finish.
- You will get a success message if the export was successful. Click OK.
- Email the certificate to an email account accessible from the Windows phone running Laserfiche Mobile.
- Certificates that are sent via email appear as message attachments. When a certificate is received, review its contents and install it on the device running Laserfiche Mobile.
Note: Make sure your mail filters do not block .cer files.
If you have trouble enabling WinHTTP tracing under the General section of the Laserfiche Mobile Configuration Page, do the following:
- From the Run dialog, type regedit, and press Enter.
- Browse to the following registry key: HKLM\SOFTWARE\Microsoft\Windows\CurrentVersion\Internet Settings\WinHttp.
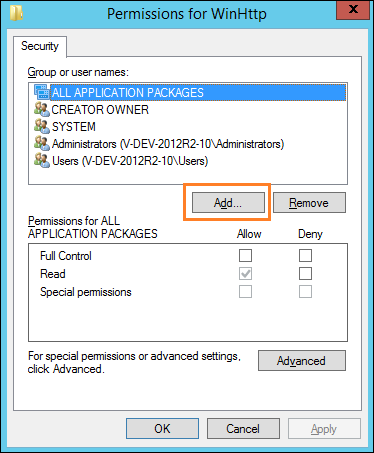
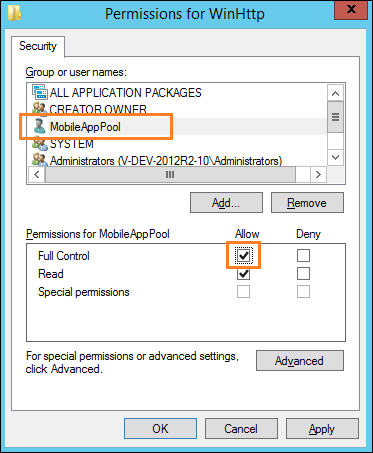
- Right-click on WinHttp and select Permissions.
- In the Permissions for WinHttp dialog box, click Add.
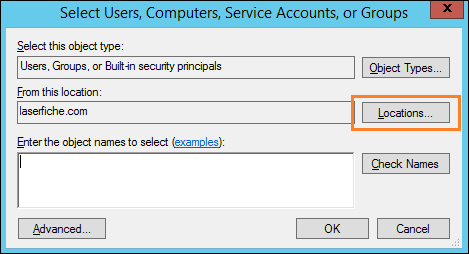
- In the Select Users, Computers, Service Accounts, or Groups dialog click Locations.
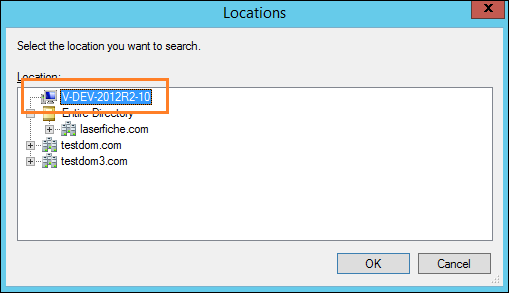
- In the Locations dialog box, select the local machine and click OK.
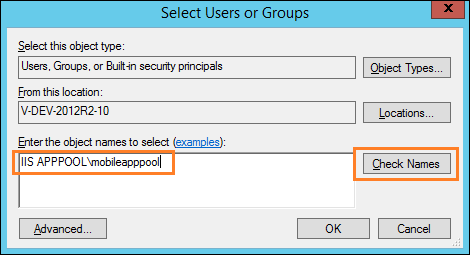
- Under Enter the object names to select, enter IIS APPPOOL\mobileapppool and click Check Names. Click OK.
- In the Permissions for WinHttp dialog box, make sure MobileAppPool is selected.
- Under Permissions for MobileAppPool, select the Allow checkbox next to Full Control, and click OK.
- Open the General section of the Laserfiche Mobile Configuration page. The Enable WinHTTP tracing should now be available.
If a document or folder has been edited in another client application, e.g., the Laserfiche Client, you will need to refresh the document or folder. Navigate to the Folder Browser and press refresh  on the top toolbar. If a template or field has been changed, it will be updated when you reopen the Fields page.
If the app freezes or is behaving unexpectedly, you may need to restart it.
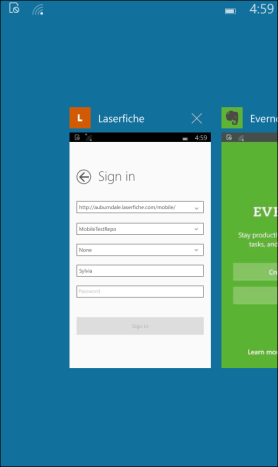
- Long press the device's back button to open a list of all running apps.
- Press the X to close Laserfiche Mobile.
|
This documentation is specific to version 9.3. You can find the most up-to-date help files for the latest version at Current Online Laserfiche Product Help Files. For further help or feedback, please see the Laserfiche Support Site. |
© 2015 Laserfiche. All Rights Reserved. |
