Importing Workflow Import Files
You can import workflows and business processes as XML-based Workflow Import Files (.wfi). Since business processes are a type of workflow, they are imported the same way. However, how you import a business process will have security implications.  Show me these implications.
Tip: To learn about exporting Workflow Import files (.wfi), see Exporting Workflow Definitions.
| Action |
Publish business process rule with Import Wizard? |
Security result |
| Import as new workflow |
Yes |
The imported rule's security will be used. |
| Import as new workflow |
No |
The rule will use the default security. If the rule is enabled, the Everyone Group can start the business process and view its details. |
| Import and replace existing workflow |
Yes |
The imported rule's security will replace the existing security. |
| Import and replace existing workflow |
No |
The existing rule's security will be retained. |
Workflow Import Files (.wfi):
Note: C# Source Code files (.cs) cannot be imported to Workflow.
To import a Workflow Import File
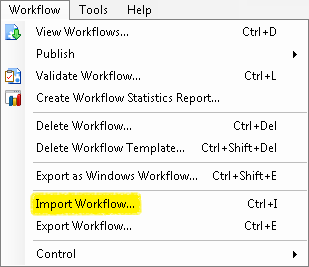
- Double-click the Workflow Import File (.wfi) file. Alternatively, in the Workflow Designer, select Import Workflow under Workflow in the main menu, browse to and select the .wfi file, and click Open.
- In the opening screen of the Workflow Import Wizard, click Next.

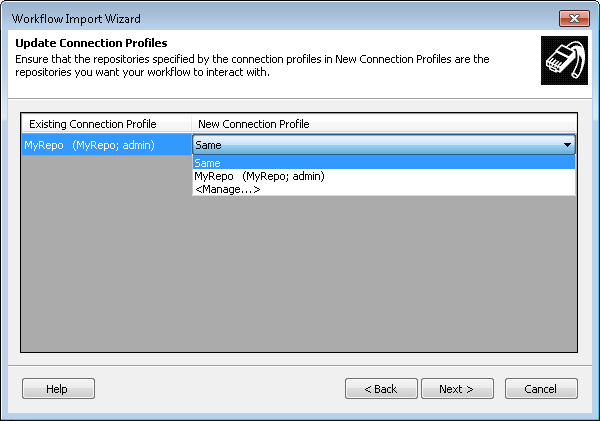
- If the Workflow Import File contains one or more connection profiles, the Update Connection Profiles screen will let you specify the connection profile that contains the Laserfiche Server, repository, and user you want to use with your imported workflow(s). The connection profiles listed under Existing Connection Profile and New Connection Profile are in the following format: Connection Profile Name (Repository Name; User Name).
Caution: If you do not specify the correct connection profile, the imported workflow(s) may fail or make changes to the wrong repository.
- Under Existing Connection Profile, select one or more profiles you want to update.
- Under New Connection Profile, use the drop-down menu to select a connection profile that specifies the repository you want your imported workflow(s) to interact with.
- Choose Same to have the imported workflow(s) use the same connection profile as they did before they were imported. For this selection to work as intended, the repository specified by the connection profile listed under Existing Connection Profiles must be accessible to the current Workflow Server.
- Choose a connection profile from the list.
- Choose Manage to open the Profile Manager, where you can add, edit, or remove connection profiles.
- When you are finished updating connection profiles, click Next.
- The import wizard will display one or both of the following two pages depending on if there are any naming conflicts between the files being imported and workflows that currently exist on your Workflow Server.
- The Workflows to Import (with name conflicts) screen will list workflows you are importing that have the same name as workflows already on your Workflow Server. In the Action column you can choose:
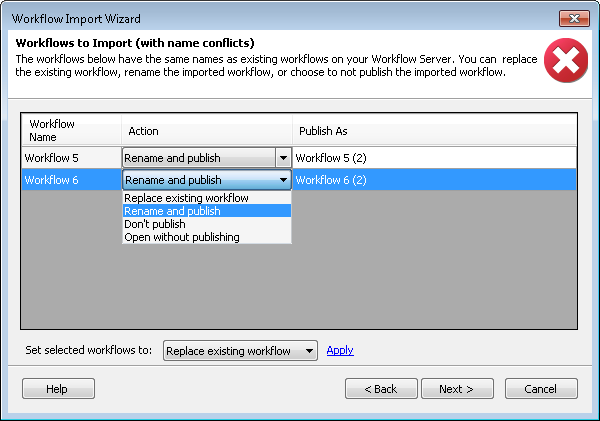
- Replace existing workflow: The workflow(s) you are importing will replace the existing occurrence of the same name on the Workflow Server. If you select this option, the name of the imported file will not change.
- Rename and publish: This option allows you to rename and publish the workflow(s). If you select this option, you can type a new name for the file(s) in the Publish As column.
- Don't publish: The workflow or business process you are importing will not be published or imported.
- Open without publishing: The workflow(s) will be opened in the Designer Pane, but it will not be published. If you select this option, starting rules for workflows and starting requirements for business processes will not be imported.
Tip: To update the Action for multiple workflows at once, hold down the CTRL key to select multiple items at a time. Choose an option from the Set selected workflows to drop-down menu at the bottom of the dialog box, and click Apply to update all the selected workflows.
- After configuring the names and publish actions for the workflow(s), click Next.
- The Starting Rules to Import screen lists workflows that will be imported, the number of starting rules each workflow has, and how many of those starting rules were automatically renamed (Auto-Corrected) due to a name conflict. (If a starting rule you are importing has the same name as a starting rule already on your Workflow Server, the starting rule will be automatically renamed.) When you select a workflow, the starting rules for that workflow will be listed below it with their existing names and the names they will be published under. In the Action column you can choose to:

- Publish: Publishes the starting rule with the name given in the Publish As column.
Note: Choosing Publish for starting rules with name conflicts will Rename and Publish the rule. Click Apply to update all the selected starting rules.
- Rename and publish: If you select this option, you can type a new name for the starting rule in the Publish As column. The starting rule will be published with the name you provided.
- Don't publish: The starting rule will not be imported or published.
Tip: To view the starting rules for multiple workflows, hold down the CTRL key and select multiple workflows. The starting rules for all selected workflows will appear in the bottom section.
Tip: To update the Action for multiple starting rules at once, select the workflows with the starting rules you want to update in the top section and select the starting rules you want to update in the bottom section. (Hold down the CTRL key to select more than one workflow and/or starting rule at a time). Choose an option from the Set selected rules to drop-down menu at the bottom of the screen.
Note: If you choose to publish an imported business process but not publish its business process rule, a new, blank business process rule will be created for the business process.
- Optional: From the Starting Rules to Import screen, you can enable or disabled the starting rules you are importing. By default, rules are disabled. Check the Enable checkbox next to a starting rule to enable the rule. Clear the box to disable the rule. Alternatively, select multiple rules at once by holding down the CTRL key and selecting Enabled or Disabled from the Set selected rules to drop-down menu at the bottom of the screen. Click Apply to update all the selected starting rules.
Note: You can enable and/or edit disabled starting rules, at any time, from the Rule Manager pane.
- The Copy Referenced Objects screen will appear when you import workflows with certain objects: attachments, data sources, web services, or specially configured e-mail servers that have the same name as objects already on the Workflow Server. This screen shows the object's name, its type, and the workflow it is associated with. In the Action column you can choose to:
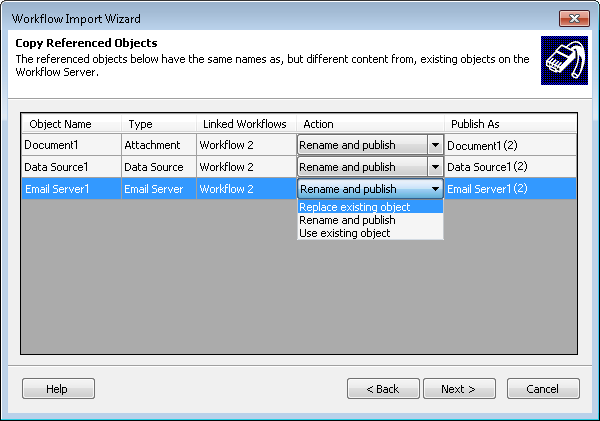
- Rename and publish: If you select this option, you can type a new name for the object in the Publish As column. The workflow will be published with the provided object name.
- Replace existing object: The object you are importing will replace the existing object of the same name on the Workflow Server. If you select this option, the object's name will not change.
- Use existing object: The object will not be imported and the workflow will the object that is currently on your Workflow Server.
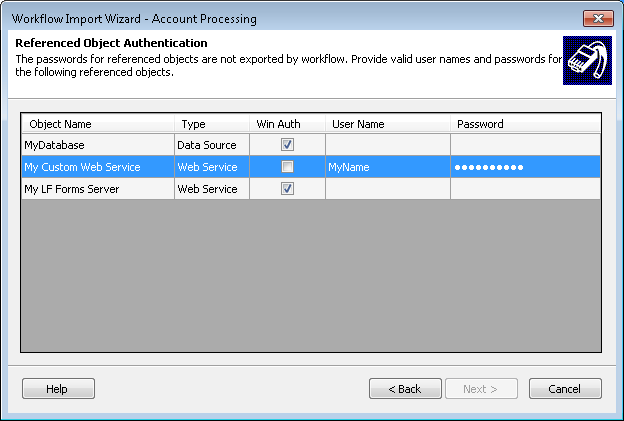
- If the workflows you are importing have password protected data sources or Web services that are not already configured in the Workflow Administration Console, the Referenced Object Authentication screen will prompt you to provide passwords for those objects. Select the checkbox under Win Auth to use the Windows Authentication credentials of the current user. Clear this checkbox to type a user name and password in the User Name and Password columns. Provide valid user names and passwords for all listed reference objects, and click OK.
- After configuring the names and publish status for the workflows, starting rules, and objects, click Next.
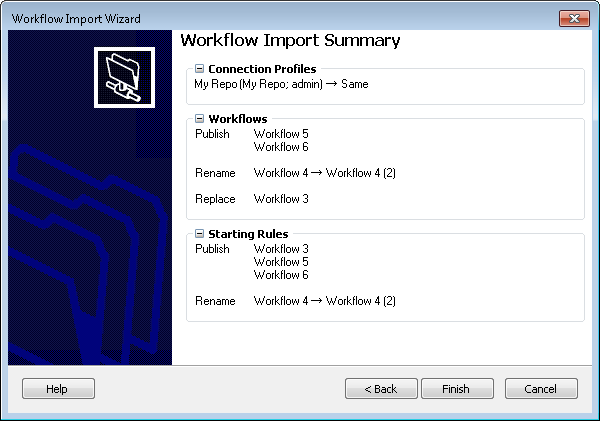
- The Workflow Import Summary screen will display the connection profile changes, workflows, starting rules, and referenced objects that will be imported. Click the minus
 or plus
  button next to the category title to collapse or expand each category.
- Click Finish to import. Upon successful completion, the Workflow Designer dialog box will appear.
- You can access, enable/disable, or edit the imported workflow definition(s) from the Rule Manager Pane in the Workflow Designer.
