Permissions and Rights Node
This node, under Security in the Workflow Administration Console, allows you to define the general permissions a user or group has for accessing Workflow features. You can also grant or deny rights to specific workflows.
Security rules and hierarchy
- Permissions and rights can only be granted to Active Directory users, not to Laserfiche users.
- After assigning permissions and rights for a user or group, you can later remove the permissions and rights.
General Permissions
- Permissions are either given or absent, and they are absent by default. If a permission is absent for a user or group they will not have the permission unless they are part of a group that has been given the permission.
 Show me an example. You can have one or more of the following permissions.
Example: Judy was not given permission to create workflows, and because that permission is absent, she cannot create workflows. Later, Judy joins the IT group, which does have permission to create workflows. Even though the permission to create workflows is still absent for Judy personally, because the IT group has permission to create workflows, Judy does as well.
- Manage Trustees: Allows you to add, modify, and delete the security settings for users and groups in this node. With this permission, you can change users and groups' permissions and rights.
Note: Removing this permission from yourself may be irreversible because you will no longer be able to modify your own security settings (including this permission). An administrator will have to restore the permission to your account.
- Create Workflows: Lets you create and publish new workflows.
- Delete Workflows: Lets you delete existing workflows if you have Editor rights to the workflows.
- Search Workflows: Allows you to search for workflows and create workflow statistics reports.
- Modify Settings: Allows you to
- Browse the file system
- Set options in the Workflow Administration Console such as those for creating e-mail servers, attachments, trustee directories, certificates, and data sources.
- Modify, create, and delete external objects.
- Add or delete custom activities from the Workflow Server.
- View, add, or delete monitored repositories and subscribers.
- Modify Workflow Server options in the Advanced Server Options, Scripting, Task Error Handlers, and other Server Configuration nodes.
- Modify licenses.
- Modify ADO.NET user settings.
- ADO Access: Access ADO.NET tables for reporting, bypassing normal security. Note that this permission effectively grants the Search Workflows permission and Viewer right to all workflows via the reporting tables.
Workflow Rights
- Workflow Rights are specified per workflow. Users and groups can have one of the following rights for each workflow. By default, users and groups have Viewer rights for all workflows.
- Editor: Can view, modify, and delete a workflow.
- Viewer: Can search for and view a workflow. This right effectively makes a workflow read-only.
- No Access: Cannot search for or view a workflow. Users with No Access to a workflow will not be able to see that the workflow exists.
Note: A user with Manage Trustee permissions will be able to see all workflows when viewing or modifying security settings regardless of having No Access to some or all workflows.
- If a user is given different rights than a group the user is part of, the user's specific rights will take precedence. If a user is not given any rights specifically, but is part of two or more groups with different rights, the more restrictive rights will be applied to the user. Show me an example.
Example: Ralph has Editor rights to Workflow 2, and he is part of a group that has No Access to Workflow 2. Ralph can edit Workflow 2 regardless of the rights of his group.
Ralph is not given any specific rights to Workflow 3 (he has the default Viewer rights), but he is part of two groups that have different rights to Workflow 3. One group has Editor rights and the other has No Access to Workflow 3. Because Ralph was not given any specific rights to the workflow, he will have the more restrictive right (i.e., No Access) to Workflow 3.
Hierarchy
- Administrators have all permissions and Editor rights to all workflows. You cannot delete the only user or group with Administrator privileges because you must have at least one Administrator.
- Users or groups not listed in this node will have the default permissions (none) and rights (Viewer) unless they are part of a group listed in this node.
- If a permission conflicts with a right, the more restrictive of the two takes precedent. Show me an example.
Example: Bill has the general permission that allows him to delete workflows. However, his boss denied him access rights to Workflow 1. Even though Bill has the general permissions to delete, he cannot delete Workflow 1. Susan does not have the general permission to delete workflows. Even though she has editor (full) rights to Workflow 1 which would normally allow her to delete the workflow, she cannot delete it because of her general permission settings.
Note: By default, all users are part of the Everyone group which has Administrator (full) permissions and rights. If a user is part of the Everyone group and the Everyone group has administrator privileges, you can only restrict their rights, not their permissions. Because permissions cannot be denied, only absent, the user's absent permissions will default to the permissions granted to the groups the user is in. In this case, if the user is part of the Everyone group, they will have full (administrator) permissions. To avoid this situation, make another user or group an administrator and remove the administrator setting from the Everyone group. Then only the user or group specified will have full permissions and rights and everyone else will have no permissions and Viewer rights, unless otherwise specified.
Show me this node.
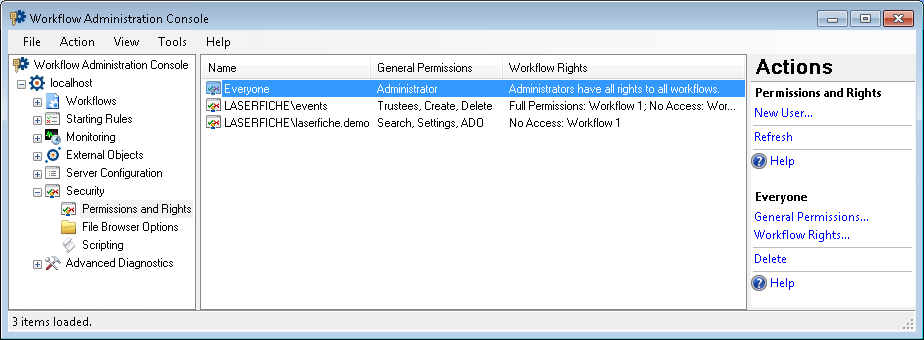
To open this node
- In the Workflow Administration Console's Console Pane, expand the Security node.
- Select Permissions and Rights. The node will list of all the Windows and Active Directory users configured to have Workflow permissions and rights.
Tip: You can refresh this list to reflect recent changes by clicking the Refresh link below Permissions and Rights in the Actions Pane. Alternatively, right-click the Permissions and Rights node and select Refresh.
To add a new user or group
- In the Console Pane, select the Permissions and Rights node. Alternatively, select any user listed in the center Details Pane when the node is selected.
- Click New User in the Actions Pane, or right-click and select New User.
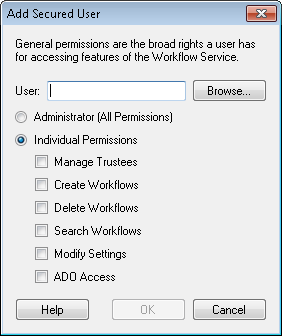
- In the Add Secured User dialog box, select Browse.
- The Select User or Group dialog box will open.
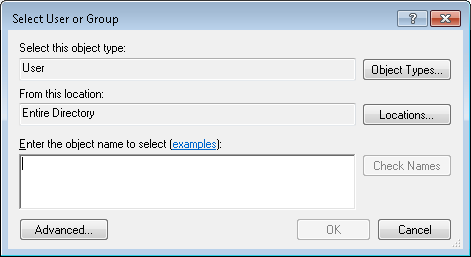
- Optional: Click Object Types and choose whether you want to search for Users, Groups, or Built-in security principals. User is selected by default. Click OK.
- Optional: Click Locations to choose where Workflow will search for users and groups. Choose a location, and click OK.
- Under Enter the object name to select, enter the name of an existing Windows or Active Directory user or group. Click examples to see the syntax that can be used.
Note: Workflow will only respect users and groups permissions defined in this node for Windows and Active Directory users and groups. You cannot search for Laserfiche users.
- Click Check Names. The Workflow Administration Console will search for the name according to the Object Types and Locations specified above. If the name is valid, it will become underlined.
- Optional: To perform a more advanced search, click Advanced.
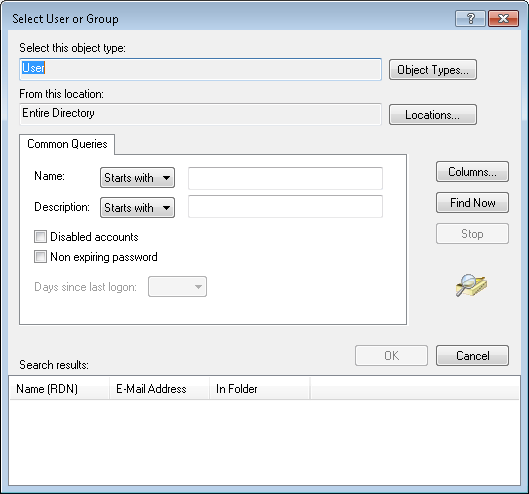
- Select Object Types to determine the type of object to search for (e.g., users or groups).
- Select Locations to define where the search should be performed (e.g., the local machine, across the active directory, a portion of the active directory).
- Under Common Queries, configure your search. Select Columns to build a more specific query based on specific properties.
- Click Find Now to perform the search.
- Select a result in the bottom pane.
- Click OK.
- Once the desired user or group has been found (underlined), select OK.
- Grant permissions to the selected user or group in the Add Secured User dialog box.
- Select Administrator (All Permissions) to give the user or group all general permissions and access rights to all workflows and starting rules.
- Select Individual Permissions to only grant certain permissions. Check the permissions you want to grant.
Note: Selecting Individual Permissions and none of the permissions below will not grant the user or group any permissions.
- Click OK.
To modify user or group permissions
- In the Details Pane, select the user or group whose permissions you want to modify.
- In the Actions Pane, click General Permissions
- Grant permissions to the selected user or group in the Modify Secured User dialog box.
- Select Administrator (All Permissions) to give the user or group all general permissions and access rights to all workflows and starting rules.
- Select Individual Permissions to only grant certain permissions. Select the permissions you want to grant.
- Click OK.
To grant or deny rights to specific workflows
Note: Users with Administrator permissions have Editor rights (full rights) to all workflows.
- In the Details Pane, select the user or group whose permissions you want to modify.
- In the Actions Pane, click Workflow Rights.
- In the Modify User Workflow Rights dialog box, select a workflow.
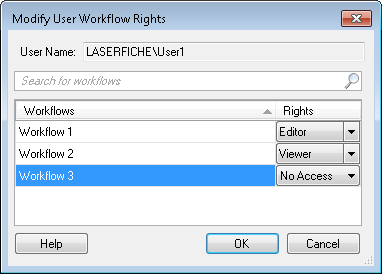
Tip: You can search for workflows by typing a workflow name in the text box that says Search for workflows. Click the red X  to clear a search.
- In the Rights column choose to give the user or group one of the following rights to the workflow.
- Editor: The user or group can change and/or delete the workflow.
- Viewer: The user or group can open the selected workflow but not make any changes to it.
- No Access: The user or group cannot search for or see that the workflow even exists.
- Configure all desired workflow rights for the user or group.
- Click OK.
Tip: You can modify these rights at any time by selecting the user in the Details Pane and clicking Workflow Rights in the Actions Pane.
To delete a user or group from this node
- In the Details Pane, select the user or group you want to delete permissions and rights for.
- In the Actions Pane, click Delete.
Note: Removing a user or group does not delete it from your machine or active directory. Instead, the user or group will be removed from this node and their security settings will be reverted to the default (no permissions and Viewer rights).
Note: Security changes are recorded in the service log, which is found at <Workflow Install Directory>\logs. (The default location is C:\Program Files\Laserfiche\Laserfiche Workflow 9\Logs.)
To export the contents of this node in a .csv, .xml, or .txt file
- Select the node in the Console Pane.
- Select View from the main menu.
- Click Export Contents.
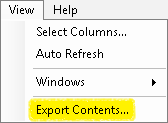
- In the Export data dialog box, name the exported file.
- Select CSV File, XML File, or Tab Delimited Text File from the drop-down menu.
- Click Save.