Connection
When you first open Laserfiche Capture Engine, you will need to define a connection to the repository you want to retrieve entries from. You can do this in the  Connection section of the Laserfiche Capture Engine dialog box.

To define a repository connection
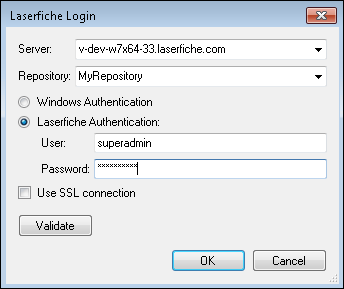
- Next to Server, specify the server where the repository is located.
- Once a server has been specified, the repositories on that server will be listed in the Repository drop-down menu. Select or type in the name of the repository you want to connect to.
- Select if you want to log in using Windows authentication or your Laserfiche account.
- Optional: Select Require users to provide a login after opening this session: if you want users to enter their login information each time they connect to the repository using Laserfiche Capture Engine. When it is cleared, they will not need to log in each time. Their credentials will be remembered.
- Select Use SSL connection: if you want to encrypt your connection.
- Click Apply to validate the connection.
If a connection has already been defined, you can click Change to modify it.
Note: Some actions require you to provide login information again. For example, if an administrator changes the account password for the account used to connect to the repository, a Laserfiche Login dialog box will appear when trying to scan. This is because Laserfiche Capture Engine needs the new password to connect to the repository.